Saving to a SQLite database in your Android application
This is the fourth post in my series about saving data in Android applications. Here are the other posts :
Introduction : How to save data in your Android application
Saving data to a file in your Android application
Saving preferences in your Android application
The previous posts described how to save files to the file system and to the preferences files. This can be enough if for a simple application, but if you data has a complex structure or if you have a lot of data to save, using a database is a better option. Managing a database requires more knowledge and setup, but it comes with many validations and performance optimization. The Android SDK includes the open source SQLite database engine and the classes needed to access it.
SQLite is a self-contained relational database that requires no server to work. The database itself is saved to a file in the internal storage of your application, so each application has its own private database that is not accessible to other applications. You can learn more about the SQLite project itself and its implementation of the SQL query language at http://www.sqlite.org.
New to databases? A relational database saves data to tables. Each table is made of columns, and for each column you must choose a name and the type of data that can be saved in it. Each table should also have a column or many column that are set as the key of the table so each row of data can be uniquely identified. Relationships can also be defined between tables.
The basics of databases and the SQL query language used by most databases could take may articles to explain. If you don’t know how to use a database, this is a subject worth learning more aboutsince databases are used in almost all applications to store data.
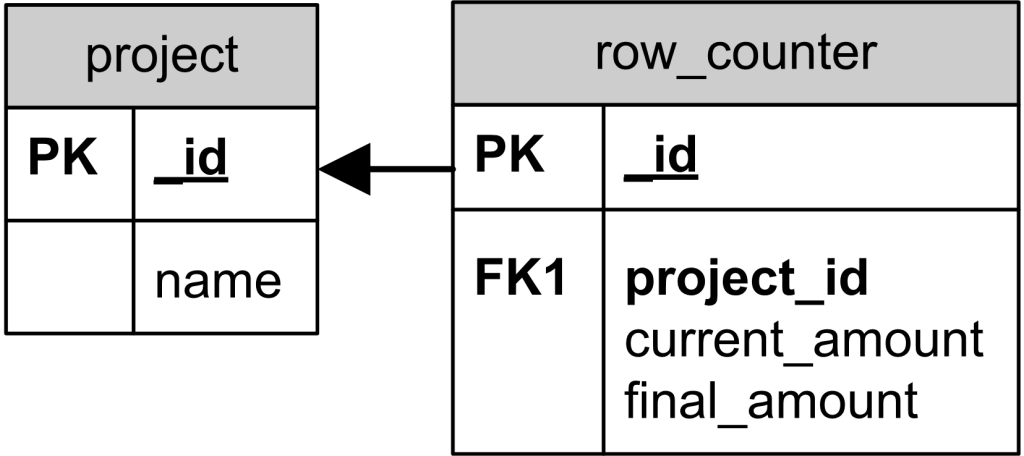
To demonstrate how to create a database and interact with it, I created a small sample application, which is available at http://github.com/CindyPotvin/RowCounter. The application is a row counter for knitting projects: the user can create a knitting project containing one or many counters used to track the current number of rows done and to show the total amount of rows to reach. The structure of the database is as follow, with a project table in relation with a row_counter table :
First, to be able to create the database, we need a contract class for each table that describes the name of the elements of the table. This class should be used each time the name of elements in the database is required. To describe the name of each column, the contract class also contains a subclass with an implementation of the android.provider.BaseColumn, which automatically adds the name of an_ID and of a _COUNT column. I also like to put the CREATE TABLE SQL query in the contract class so all the strings used in SQL queries are at the same place. Here is the contract class for the row_counter table in the example :
/**
* This class represents a contract for a row_counter table containing row
* counters for projects. The project must exist before creating row counters
* since the counter have a foreign key to the project.
*/
public final class RowCounterContract {

/**
* Contains the name of the table to create that contains the row counters.
*/
public static final String TABLE_NAME = "row_counter";

/**
* Contains the SQL query to use to create the table containing the row counters.
*/
public static final String SQL_CREATE_TABLE = "CREATE TABLE "
+ RowCounterContract.TABLE_NAME + " ("
+ RowCounterContract.RowCounterEntry._ID + " INTEGER PRIMARY KEY AUTOINCREMENT,"
+ RowCounterContract.RowCounterEntry.COLUMN_NAME_PROJECT_ID + " INTEGER,"
+ RowCounterContract.RowCounterEntry.COLUMN_NAME_CURRENT_AMOUNT + " INTEGER DEFAULT 0,"
+ RowCounterContract.RowCounterEntry.COLUMN_NAME_FINAL_AMOUNT + " INTEGER,"
+ "FOREIGN KEY (" + RowCounterContract.RowCounterEntry.COLUMN_NAME_PROJECT_ID + ") "
+ "REFERENCES projects(" + ProjectContract.ProjectEntry._ID + "));";

/**
* This class represents the rows for an entry in the row_counter table. The
* primary key is the _id column from the BaseColumn class.
*/
public static abstract class RowCounterEntry implements BaseColumns {

   // Identifier of the project to which the row counter belongs
   public static final String COLUMN_NAME_PROJECT_ID = "project_id";

   // Final amount of rows to reach
  public static final String COLUMN_NAME_FINAL_AMOUNT = "final_amount";

   // Current amount of rows done
   public static final String COLUMN_NAME_CURRENT_AMOUNT = "current_amount";
   }
}
To create the tables that stores the data described by the contracts, you must implement the android.database.sqllite.SQLLiteOpenHelper class that manages the access to the database. The following methods should be implemented as needed:
- onCreate: this method is called the first time the database is opened by your application. You should setup the database for use in that method by creating the tables and initializing any data you need.
- onUpdate: this method is called when your application is upgraded and the version number has changed. You don’t need to do anything for your first version, but in the following versions you must provide queries to modify the database from the old version to the new structure as needed so your user don’t loose their data during the upgrade.
- onDowngrade (optional) : you may implement this method if you want to handle the case where your application is downgraded to a version requiring an older version. The default implementation will throw a SQLiteException and will not modify the database.
- onOpen (optional) : this method is called after the database has been created, upgraded to a newer version or downgraded to an older version.
Here is a basic implementation of the android.database.sqllite.SQLLiteOpenHelper for the example that executes an SQL CREATE TABLE query for each table of the database in the onCreate method. There is no method available in the android.database.sqlite.SQLiteDatabase class to create a table, so you must use the execSQL method to execute the query.
/**
* This class helps open, create, and upgrade the database file containing the
* projects and their row counters.
*/
public class ProjectsDatabaseHelper extends SQLiteOpenHelper {
   // If you change the database schema, you must increment the database version.
   public static final int DATABASE_VERSION = 1;
   // The name of the database file on the file system
   public static final String DATABASE_NAME = "Projects.db";

   public ProjectsDatabaseHelper(Context context) {
      super(context, DATABASE_NAME, null, DATABASE_VERSION);
      }

   /**
    * Creates the underlying database with the SQL_CREATE_TABLE queries from
    * the contract classes to create the tables and initialize the data.
    * The onCreate is triggered the first time someone tries to access
    * the database with the getReadableDatabase or
    * getWritableDatabase methods.
    *
    * @param db the database being accessed and that should be created.
    */
    @Override
   public void onCreate(SQLiteDatabase db) {
      // Create the database to contain the data for the projects
      db.execSQL(ProjectContract.SQL_CREATE_TABLE);
      db.execSQL(RowCounterContract.SQL_CREATE_TABLE);
      initializeExampleData(db);
      }

   /**
    * This method must be implemented if your application is upgraded and must
    * include the SQL query to upgrade the database from your old to your new
    * schema.
    *
    * @param db the database being upgraded.
    * @param oldVersion the current version of the database before the upgrade.
    * @param newVersion the version of the database after the upgrade.
    */
   @Override
   public void onUpgrade(SQLiteDatabase db, int oldVersion, int newVersion) {
      // Logs that the database is being upgraded
      Log.i(ProjectsDatabaseHelper.class.getSimpleName(),
            "Upgrading database from version " + oldVersion + " to " + newVersion);
      }
   }
Once the android.database.sqllite.SQLLiteOpenHelper is implemented, you can get an instance of the database object android.database.sqlite.SQLiteDatabase using the getReadableDatabase method of the helper if
you only need to read data or the getWritableDatabase method if you need to read and write data. There are four kinds of basic operations that can be done with the data, and modifications can not be undone like in all databases.
- Inserting a new row:the insert method of the android.database.sqlite.SQLiteDatabase object inserts a new row of data in a table. Data can be inserted with a SQL INSERT query using the execSQL method, but using insert is recommended to avoid SQL injection: only one database row can be created by the insert method and nothing else, regardless of the input. In the following example, a few test projects are initialized in the database of the application by the onCreate method of the database helper after the creation of the table:
/** * Initialize example data to show when the application is first installed. * * @param db the database being initialized. */ private void initializeExampleData(SQLiteDatabase db) { // A lot of code is repeated here that could be factorized in methods, // but this is clearer for the example // Insert the database row for an example project in the project table in the // database long projectId; ContentValues firstProjectValues = new ContentValues(); firstProjectValues.put(ProjectContract.ProjectEntry.COLUMN_NAME_TITLE, "Flashy Scarf"); projectId = db.insert(ProjectContract.TABLE_NAME, null, firstProjectValues); // Insert the database rows for a row counter linked to the project row // just created in the database (the insert method returns the // identifier of the row) ContentValues firstProjectCounterValues = new ContentValues(); firstProjectCounterValues.put(RowCounterContract .RowCounterEntry.COLUMN_NAME_PROJECT_ID, projectId); firstProjectCounterValues.put(RowCounterContract .RowCounterEntry.COLUMN_NAME_FINAL_AMOUNT, 120); db.insert(RowCounterContract.TABLE_NAME, null, firstProjectCounterValues); // Insert the database row for a second example project in the project // table in the database. ContentValues secondProjectValues = new ContentValues(); secondProjectValues.put(ProjectContract.ProjectEntry.COLUMN_NAME_TITLE, "Simple Socks"); projectId = db.insert(ProjectContract.TABLE_NAME, null, secondProjectValues); // Insert the database rows for two identical row counters for the // project in the database ContentValues secondProjectCounterValues = new ContentValues(); secondProjectCounterValues.put(RowCounterContract .RowCounterEntry.COLUMN_NAME_PROJECT_ID, projectId); secondProjectCounterValues.put(RowCounterContract .RowCounterEntry.COLUMN_NAME_FINAL_AMOUNT, 80); db.insert(RowCounterContract.TABLE_NAME, null, secondProjectCounterValues); db.insert(RowCounterContract.TABLE_NAME, null, secondProjectCounterValues); } - Reading existing rows: the query method from the android.database.sqlite.SQLiteDatabase class retrieves the data that was previously inserted in the database. This method will return a cursor that points to the collection of rows returned by your request, if any. You can then convert the data fetched from the database table to an object can be used in your application: in the example, the rows from the project table are converted to Project objects.
/** * Gets the list of projects from the database. * * @return the current projects from the database. */ public ArrayList getProjects() { ArrayList projects = new ArrayList(); // Gets the database in the current database helper in read-only mode SQLiteDatabase db = getReadableDatabase(); // After the query, the cursor points to the first database row // returned by the request. Cursor projCursor = db.query(ProjectContract.TABLE_NAME, null, null, null, null, null, null); while (projCursor.moveToNext()) { // Get the value for each column for the database row pointed by // the cursor using the getColumnIndex method of the cursor and // use it to initialize a Project object by database row Project project = new Project(); int idColIndex = projCursor.getColumnIndex(ProjectContract.ProjectEntry._ID); long projectId = projCursor.getLong(idColIndex); project.setId(projCursor.getLong(projectId); int nameColIndex = projCursor.getColumnIndex(ProjectContract .ProjectEntry.COLUMN_NAME_TITLE); project.setName(projCursor.getString(nameColIndex)); // Get all the row counters for the current project from the // database and add them all to the Project object project.setRowCounters(getRowCounters(projectId)); projects.add(project); } projCursor.close(); return (projects); } - Updating existing rows: the update method of an instance of the android.database.sqlite.SQLiteDatabase class updates the data in a row or in multiple rows of a database table. Like with the insert method, you could use the execSQL query to run a SQL UPDATE query, but using the update method is safer. In the following example, the current row counter value for the row counter in the row_counter table is updated with the new value. According to the condition specified only the row counter with the identifier passed as a parameter is updated but with another condition you could update many rows, so you should always make sure that the condition only selects the rows you need.
/** * Updates the current amount of the row counter in the database to the value * in the object passed as a parameter. * * @param rowCounter the object containing the current amount to set. */ public void updateRowCounterCurrentAmount(RowCounter rowCounter) { SQLiteDatabase db = getWritableDatabase(); ContentValues currentAmountValue = new ContentValues(); currentAmountValue.put(RowCounterContract.RowCounterEntry.COLUMN_NAME_CURRENT_AMOUNT, rowCounter.getCurrentAmount()); db.update(RowCounterContract.TABLE_NAME, currentAmountValue, RowCounterContract.RowCounterEntry._ID +"=?", new String[] { String.valueOf(rowCounter.getId()) }); } - Deleting existing rows:the delete method of an instance of the android.database.sqlite.SQLiteDatabase class deletes a row or in multiple rows of a database table. Like with the insert method, you could use the execSQL query to run a SQL UPDATE query, but using the delete method is safer. In the following example, a row counter in the row_counter table is deleted. According to the condition specified only the row counter with the identifier passed as a parameter is deleted but with another condition you could delete many rows, so you should always make sure that the condition only selects the rows you need so you don’t delete too much data.
/**
 * Deletes the specified row counter from the database.
 *
 * @param rowCounter the row counter to remove.
 */
public void deleteRowCounter(RowCounter rowCounter) {
   SQLiteDatabase db = getWritableDatabase();

   db.delete(RowCounterContract.TABLE_NAME,
             RowCounterContract.RowCounterEntry._ID +"=?",
             new String[] { String.valueOf(rowCounter.getId()) });
   }
Finally, if you want to encapsulate access to the data in your database to avoid calling the database helper directly in your activity, you can also implement the android.content.ContentProvider class from the Android SDK. This is only required if your application must share data with other applications: you do not need one to get started, but you should consider using it as your data gets more complex.